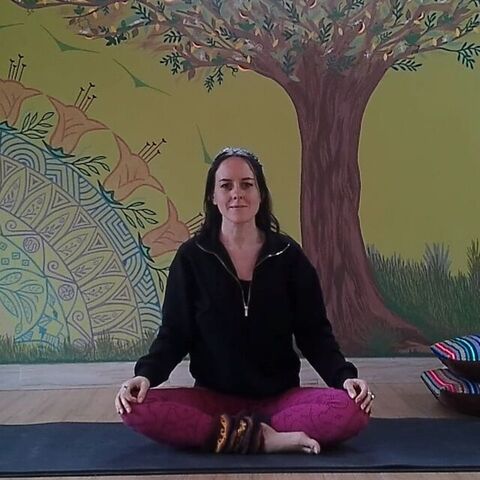
Welcome to your yin yoga practice.
Before we begin,
Just take a moment to make sure that you have everything you need for your practice today.
You'll need a yoga mat.
And if you're in a cooler climate,
Make sure you have a blanket to cover yourself with during the relaxation at the end.
You may also need to support your body with props in some of the postures.
If you have yoga blocks,
Those are great.
But you can also use cushions or pillows or a folded blanket to support yourself.
And if you have a yoga bolster,
That may be useful too.
So make sure that you have some of those with you in case you need them.
Yin yoga is a passive practice where postures are held for several minutes to stretch into the connective tissues.
These tissues are delicate and can be injured if they're stretched too forcefully or intensely.
It's good to be able to feel that something is happening,
But you should never be forcing a stretch or pushing yourself into a position.
And you never want to be feeling any physical pain as you practice.
Pain is a signal from your body that the position that you're in is not safe or beneficial for you.
So if you do feel pain at any time,
Come out of the pose.
You can come into a resting position until the next posture,
Or you can move back into another posture from the class that you didn't experience any pain in.
If you have any injuries or health conditions,
Make sure to consult with your doctor before starting a new practice.
Yin yoga can have many benefits for health and recovery,
But it's important that your body is suitably recovered,
That the stretches will benefit the tissues and won't potentially make the injury worse.
So do please check with your doctor first for your safety.
As this is an audio session,
I will talk you in and out of the postures verbally.
But if at any time you're unsure of a posture and don't know if you're in the right position,
You can always pause the recording and do a quick internet search to bring up a picture.
I've included names for all of the postures so that you can easily do this if you need to.
We're going to start in child pose today.
So come onto your hands and knees,
Bring your big toes together and open the knees out to the sides of the mat.
Sit back onto the heels and bring the upper body down between the legs,
Stretching the arms out to the corners of the mat and rest your forehead onto the mat.
You might want to take some support here.
We're going to be here for a few minutes,
So make sure that you're comfortable.
If you find it difficult to sit all the way back onto the heels,
Take a block or a pillow onto your heels to sit back onto.
And you might like to support your head with a block or by folding the arms and resting the forehead onto the forearms.
Bring the awareness into your body.
How is your body feeling today?
Observe any sensations,
Any feelings in your body.
Just acknowledge how your body's feeling right now.
In today's session,
We're going to be holding the postures for a little bit longer than we usually do,
Working our way up to holding some of the postures for seven minutes.
But if at any time you start to feel like you've been in that pose for long enough,
Or if it starts to feel too intense for you,
You can always come out of the posture earlier.
Eventually,
Yin yoga postures can be held for up to 20 minutes,
But we'll work with three to seven today.
Just scan over your body now and notice if there are any places that you can relax a little more.
The muscles around the hips or the thighs,
The shoulders.
And just welcome the sensations as you begin to open up into the connective tissues.
And slowly coming out,
Walk the hands in to bring yourself back up onto your knees.
And next we'll come into sphinx pose.
So make your way down onto your belly,
Bringing the elbows under the shoulders and the forearms parallel to the edges of the mat.
If this is a bit too intense for your back,
Moving the arms forwards so that the elbows are in front of the shoulders will decrease the intensity.
Or you can also stack the arms and rest the head onto the forearms.
Wherever you choose to be,
Relax into the posture and observe the sensations.
Check if there are any muscles that you can relax.
We often have a tendency to grip the thighs and the buttocks in this one.
So see if you can relax those a little more.
Relax the shoulders,
The shoulder blades,
The upper arms.
We'll just stay here for a few more breaths.
And slowly come out of the posture.
Gently lower yourself down to the mat.
Bring the arms to your sides and turn the head to one side.
Take some resting breaths here to observe how your body's feeling.
To observe any effects from the practice.
And when you're ready,
Make your way up to sitting.
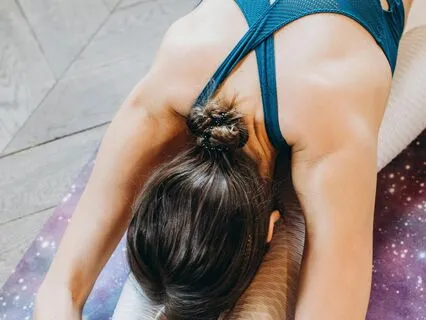
We're going to come into Caterpillar Pose.
So come to sitting with the legs extended out in front of you.
We'll be five minutes in Caterpillar.
So make sure you have all the support that you need to stay here comfortably.
If it's challenging for you to sit upright,
Sit onto a block or a folded blanket.
And if the backs of your legs feel tight,
Or if your legs bend when you sit like this,
Place some support under the knees so that your legs can just relax here.
If you're already feeling some intensity sitting upright,
Then stay as you are.
Or otherwise start to fold forwards over the legs,
Relaxing the head towards the legs.
As you fold,
That point will come where you suddenly start to feel more intensity.
The point we call the edge in yin yoga.
Once you feel that edge,
Relax into the posture.
Keep the hands at the sides of the legs.
And turning the palms upwards can be helpful to encourage the neck and the shoulders to relax here.
Scan over your body again to check for any places where the muscles are clinging.
And relax those areas.
If there are some places that feel especially uncomfortable or tight,
You can use the breath to help encourage those places to release.
Inhale into the tight or uncomfortable area.
And as you exhale,
Feel the breath carrying some of that tension away.
Keep sending the breath into any uncomfortable areas.
Using the exhalation to encourage the release.
We're going to stay here for another two minutes.
Remember,
You can always come out of the posture if it starts to feel too intense.
Or there's always the option to come up to a place that feels more comfortable to stay in.
As long as you're feeling something,
It's working.
There's no need to force a big stretch.
The best work happens when we're able to relax and feel.
And let the posture gently encourage the release over time.
And if you start to feel like you're losing intensity as your body gets used to being here,
Just allow yourself to fold forwards a little more until you feel that edge again.
And very slowly begin to make your way back up.
We've been here for a while,
So take your time to come out,
Moving slowly to avoid placing any sudden stress on the tissues.
Walk the hands in to curl the spine back to straight.
And once you're back to sitting,
We'll do a gentle backbend as a counter-stretch to open the front of the body.
So take your hands behind your back,
Turning your hands so the fingers point back towards your body,
And press into your hands to lift the chest and open the front of the body.
If it feels comfortable for your neck,
You can drop the head back,
Or otherwise keep the head and the neck straight as you lift and open the chest.
And release back to sitting.
Next we're coming into Dragonfly.
So now open your legs wide,
Bringing the legs to a comfortable open distance.
You can place support under the knees again here if that feels best for you,
And sit onto a block or blanket if you need to.
Make sure that the legs and the feet are relaxed.
Take a breath in to lift the chest,
And exhale to fold forwards,
Finding your edge.
There are three principles to holding the postures in yin yoga.
First we find our edge.
This is the best and safest place to gently stretch into the connective tissues.
And once we've come to our edge,
We find stillness in the posture.
We relax the muscles and remain still,
Simply observing and feeling whatever arises.
And the third principle is to hold the pose for the amount of time that we're going to hold it for.
And we're going to remain in this one for another three minutes.
Slowly make your way back up.
Walk the hands in to bring the spine back to straight.
And once you've come back to sitting,
Bend the knees and bring the feet to the mat,
And just rock the knees from side to side,
Observing any sensations,
Any after effects from that posture.
And when you're ready,
Come down to lying on your back for a twist.
Bend the knees and bring the knees into the chest,
Keeping the knees and the ankles touching.
And just move your hips a little over to the right,
So that you have plenty of space to bring the legs down.
Take the left hand to the outside of the right thigh,
And push the legs down to the left side.
You can place blocks or pillows under the left leg,
If the legs don't come all the way down,
So that the legs relax comfortably to the side.
We've got seven minutes in this one,
So make sure that you're comfortable.
And bring the right arm up and out to the right,
Taking the arm up to a diagonal angle,
So that the hand reaches towards the right corner of the mat.
Place some support under your right shoulder if you need to.
And if it's comfortable for your neck,
Turn the head to look over the left shoulder.
Otherwise,
Keep the head looking straight up,
And relax into the twist.
Sending the breath into any areas that feel tight or uncomfortable,
Allowing the exhalation to carry some of that tension away.
As we stay in these postures for longer,
We're able to go more deeply into our experience,
And feel more deeply into our bodies.
So I'll give you some more time of silence in these last two twists,
To allow you to go more deeply into your own experience.
We've got five more minutes here.
Slowly make your way back out.
Bring the right arm back to the right side of the body.
Take the left hand to the outside of the left leg,
And push the legs back up.
Bring the feet back to the mat.
Re-straighten your hips and your spine.
And keeping the feet apart,
Let the knees drop in together,
And take some breaths here to observe.
And we'll twist to the opposite side.
Bend the knees and bring the knees in towards the chest.
Move the hips slightly towards the left.
Take the right hand to the outside of the left leg,
And bring the legs down to the right.
Keep the right hand on the left thigh to help anchor it down.
Relax the feet and the ankles.
And bring the left arm up to a diagonal angle,
Either turning the head to look over the left shoulder,
Or keeping the head looking straight up.
This is our final posture for the relaxation,
So I'll leave you in silence to go more deeply into your experience for the full seven minutes.
Slowly coming out,
Bring the left arm back to the left side,
And take the right hand to the outside of the right leg to push the legs back up.
Take the feet to the mat,
Re-straighten the hips,
And drop the knees together for some breaths to observe.
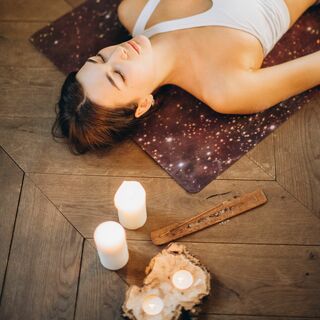
And it's time for our relaxation.
You're welcome to stay like this,
With the knees resting together if that feels best for you.
Or to come into Shavasana,
Straighten the legs,
Opening the legs so that the feet come out towards the corners of the mat.
Bring the arms a little away from the sides,
With the palms of the hands facing upwards.
And take any support that you need for your head,
Knees or ankles.
Make sure that you're warm enough,
And feel your body beginning to relax.
Watch your body gently easing into relaxation a little more with every breath.
Bring the awareness into the feet,
And feel all of the muscles in the feet relaxing and letting go.
Tension leaving the feet,
And the ankles.
Feel the ankles relaxing and releasing,
And the calves,
The knees,
The thighs,
The hips,
The lower back,
The upper back,
The spine,
The shoulder blades,
The shoulders,
The upper arms,
The elbows,
The lower arms,
The wrists,
The hands,
And the fingers.
All completely relaxed.
Feel the jaw relaxing,
And the face softening.
The back of the head heavy against the surface beneath you.
Tension releasing from the forehead.
The whole of the body completely relaxed.
Feel the whole of the body completely relaxed.
The whole of the body completely relaxed.
And slowly begin to reawaken the body.
Start to make some small movements with the fingers and the toes,
And with the wrists and the ankles.
And bring the arms up over your head to give yourself a long stretch from the hands all the way down to the feet.
Bend the knees,
Bring the knees into the chest,
Hug the knees and just rock gently from side to side,
Massaging the lower back into the mat.
And when you're ready,
Roll to one side and come back up to sitting.
This brings us to the end of the practice.
Thank you for joining me today.